
 |
| My monster Tango |
So a while back I discovered that my cat, Tango, enjoyed using the corner of our basement to relieve himself rather than his litter box. Arrrrhg. Much to my frustration nothing I did seemed to keep him from using the corner as his personal toilet. (that's another post for another time) So my solution to keep the problem (and the smell-YUCK) from getting worse was to keep my little monster out of the basement all together. This is where I ran into an issue. Our basement is open to the rest of the house, no doors, just a staircase leading down into a tiled "entryway" and a 72 in wide 75 in tall doorway leading into the
So, I did some research on custom large doors, way too expensive. I wanted to repurpose some old doors I used in our wedding, too tall and the wrong width. I thought maybe I can get some cheap closet doors and cut them to fit, wrong, that wouldn't work either. So on to Pinterest I went and started looking at different options for DIY doors. I couldn't believe I hadn't thought of it sooner! BARN DOOR! It seemed like the perfect solution for our strange doorway into the basement living space.
I found this blog that had a description of their barn door project: http://www.apartmenttherapy.com/how-to-build-a-sliding-door-fo-139922
their claim is that they built the door for less than $40...I don't know how they stayed on that budget our cost was way over that. However, their door was temporary, and I wanted to make something more permanent and more stylish. So there was my starting off point and my mind was racing.
Something I recommend you do if you are starting a project is to draw it first. I drew my plans out on paper and then spoke to the man of the house. My wonderful husband Dan. He thought I was crazy, but he was ready to tackle this build.
First things first we needed wood to make this bad boy...we decided (and our bank account thanks us) on using pallet wood for the main body of the door. Not only was it free but pallet wood has such great character, especially for a barn door! We used hammers and a pry bar to wedge the pieces off the pallet frame, and earned a few blisters as trophies for our hard work.
 |
| We did this project in July...yes July. It was so chilly! |

Here are the pallets after we tore the top boards off.
As we were taking apart the pallets we organized them into rows for what would become the top and bottom of the door.
We went to our local Menards and loaded up our VW bus with 8-1x4's and 2-1x6's to build the frame for the door.

I think we spoke to about 5 people outside the store who shared stories about their VW!
 Our door needed to be 73 inches wide, and 75 inches tall. We cut the top and bottom framing boards to the 73 inch length, then cut the side boards to fit in-between. Remember to measure twice cut once!
We choose to use connecting plates to fasten the boards together in order to reduce splintering and so we didn't have to drill at and angle. (those are the long rectangle pieces at the corners.)


Here is a picture of the door frame with the pallet wood nailed to the back. This was the first time we stood the door up, I fell in LOVE! Isn't it great?
Phew...I can't believe it's almost done! If we would have had all supplies ready to go we would have been able to get this part done in a day. A long day, however done in a day. Now onto the hardware and mounting!

 Next we needed to fasten the other door frame to the opposite side of the door. We choose to use carrage bolts. We squared up our frame on the piece that was already nailed together and drilled holes in all four corners to shove those bolts through to the other side.
 We also used some finishing nails to keep the middle piece of the frame secure to the pallet wood. If I were to redo it I would just use a few extra carrage bolts instead. Oh well, the nails just add character right?


Now we ran into our first major issue, the small wheels that we bought were too narrow for the width of the door frame. A big thanks to my dad for welding the small wheels to a metal plate that fit the width of the door frame.

We needed to pre drill holes for the wheels next. We mocked up the metal plates on the door frame marked the places to drill and used wood screws to secure the wheels in place.

Now the door stands and rolls!

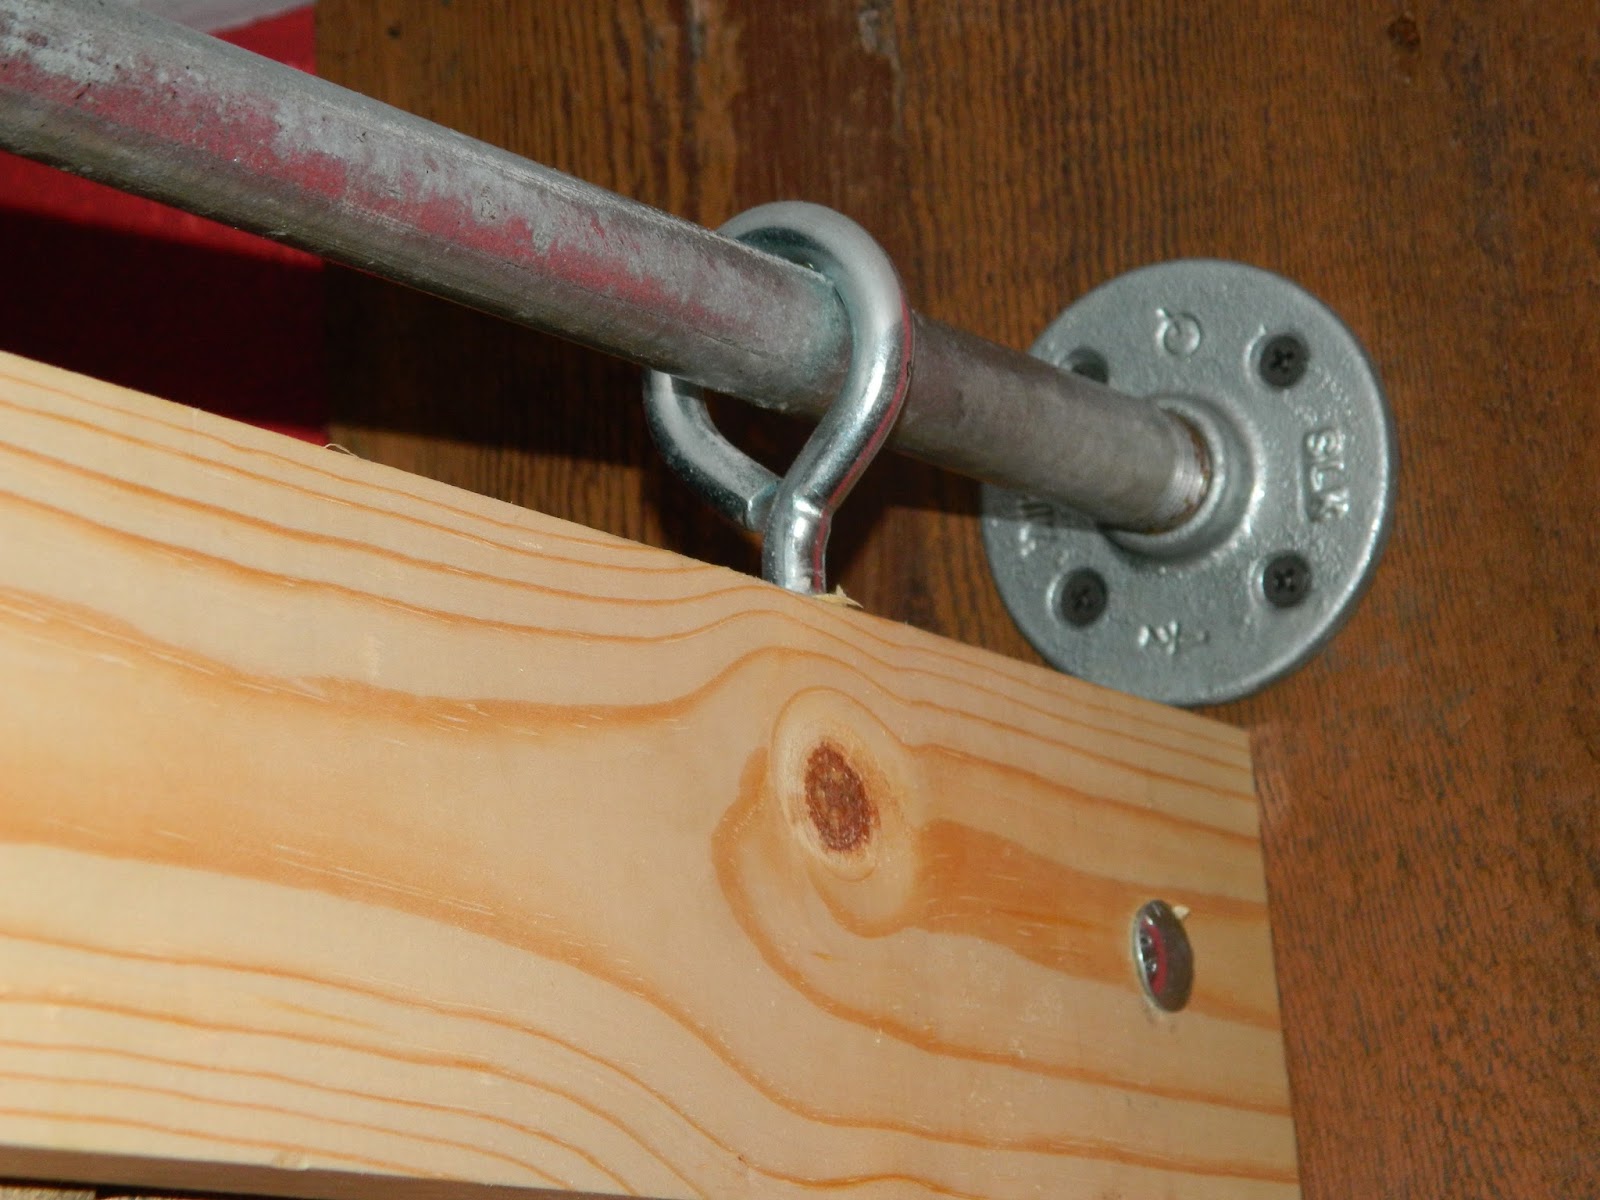
If you checked out the blog I shared at the top of the page you saw that they used galvanized pipe, floor flanges, and cargo tie down hooks for their door. We also are using the plumbing pipe and flanges, but could not find the hooks so we are using eye hooks instead. (pictured below with the hardware pictures)
So the second issue we ran into was mounting the plumbing hardware to a secure location. The stud in the wall was not in the place we needed in order to have the mount be strong so we added a piece of wood to the wall and screwed it into the stud in order to provide some added strength and it's a nice "bump stop" when the door closes.


We pre-drilled holes in the top of the door and screwed the eye hooks in. Then we mounted the hardware to the wall and the appropriate height and......TADA. We have ourselves a working sliding barn door!
*NOTE* The eye hooks are touching the pipe but are not holding the weight of the door. The pipe is their basically to keep the door standing and to provide stability side to side. The door is very heavy and the weight is distributed on the wheels not handing from the pipe.

More pictures of the door coming later when the basement returns to it's pre-litter box state :)
Happy building!
Love & Light,
This blog has instructions on how to make your own door and hardware. This would not work for our space, however it looks awesome. http://www.epbot.com/2013/03/make-your-own-sliding-barn-door-for.html
No comments:
Post a Comment